Microsurgical techniques for vascular anastomoses
Esther Vögelin 2
1 Department of Hand Surgery, Inselspital/University of Bern, Bern, Switzerland
2 Plastic, Hand and Peripheral Nerve Surgery, Inselspital/University of Bern, Bern, Switzerland
Introduction
Today, microsurgical techniques have become an integral part of the armamentarium for hand surgeons, allowing for soft tissue coverage and functional reconstruction after trauma or oncologic resections. One of the most important factors for successful finger revascularization, replantation, and free flap transfer is a well-executed anastomosis. Thrombosis, leakage and stenosis are the main complications and the only way to prevent them is continuous training and a perfect technique. In this chapter, we present the basic microsurgical techniques for vascular microanastomosis and introduce some alternatives to conventional anastomosis.
Definition
Vascular microanastomosis is the procedure performed to connect two blood vessels (arteries or veins). Microanastomoses are then further classified depending on the type of connection (either end-to-end, end-to-side, or side-to-side microanastomoses), and the material used for vascular connection. Differences between conventional microanastomoses performed with suture material and the sutureless techniques [1] are further explained in literature.
Conventional surgical technique
Microsurgical and optical instruments
Instruments needed to perform microsurgery include scissors, vessel-dilating forceps, needle applier, temporary vessel clamps, forceps, and irrigation tip. They must be in good shape and reliable when needed. The microscope should be correctly positioned in order to provide a relaxed and neutral neck position for the operator as well as a comfortable posture for his arms on the operative surface. Most microvascular anastomosis techniques should be completed with either 9–0 or 10–0 monofilament nylon sutures. Anastomosis of fingertip arteries or in children are sutured using supramicrosurgical techniques with 11–0 sutures.
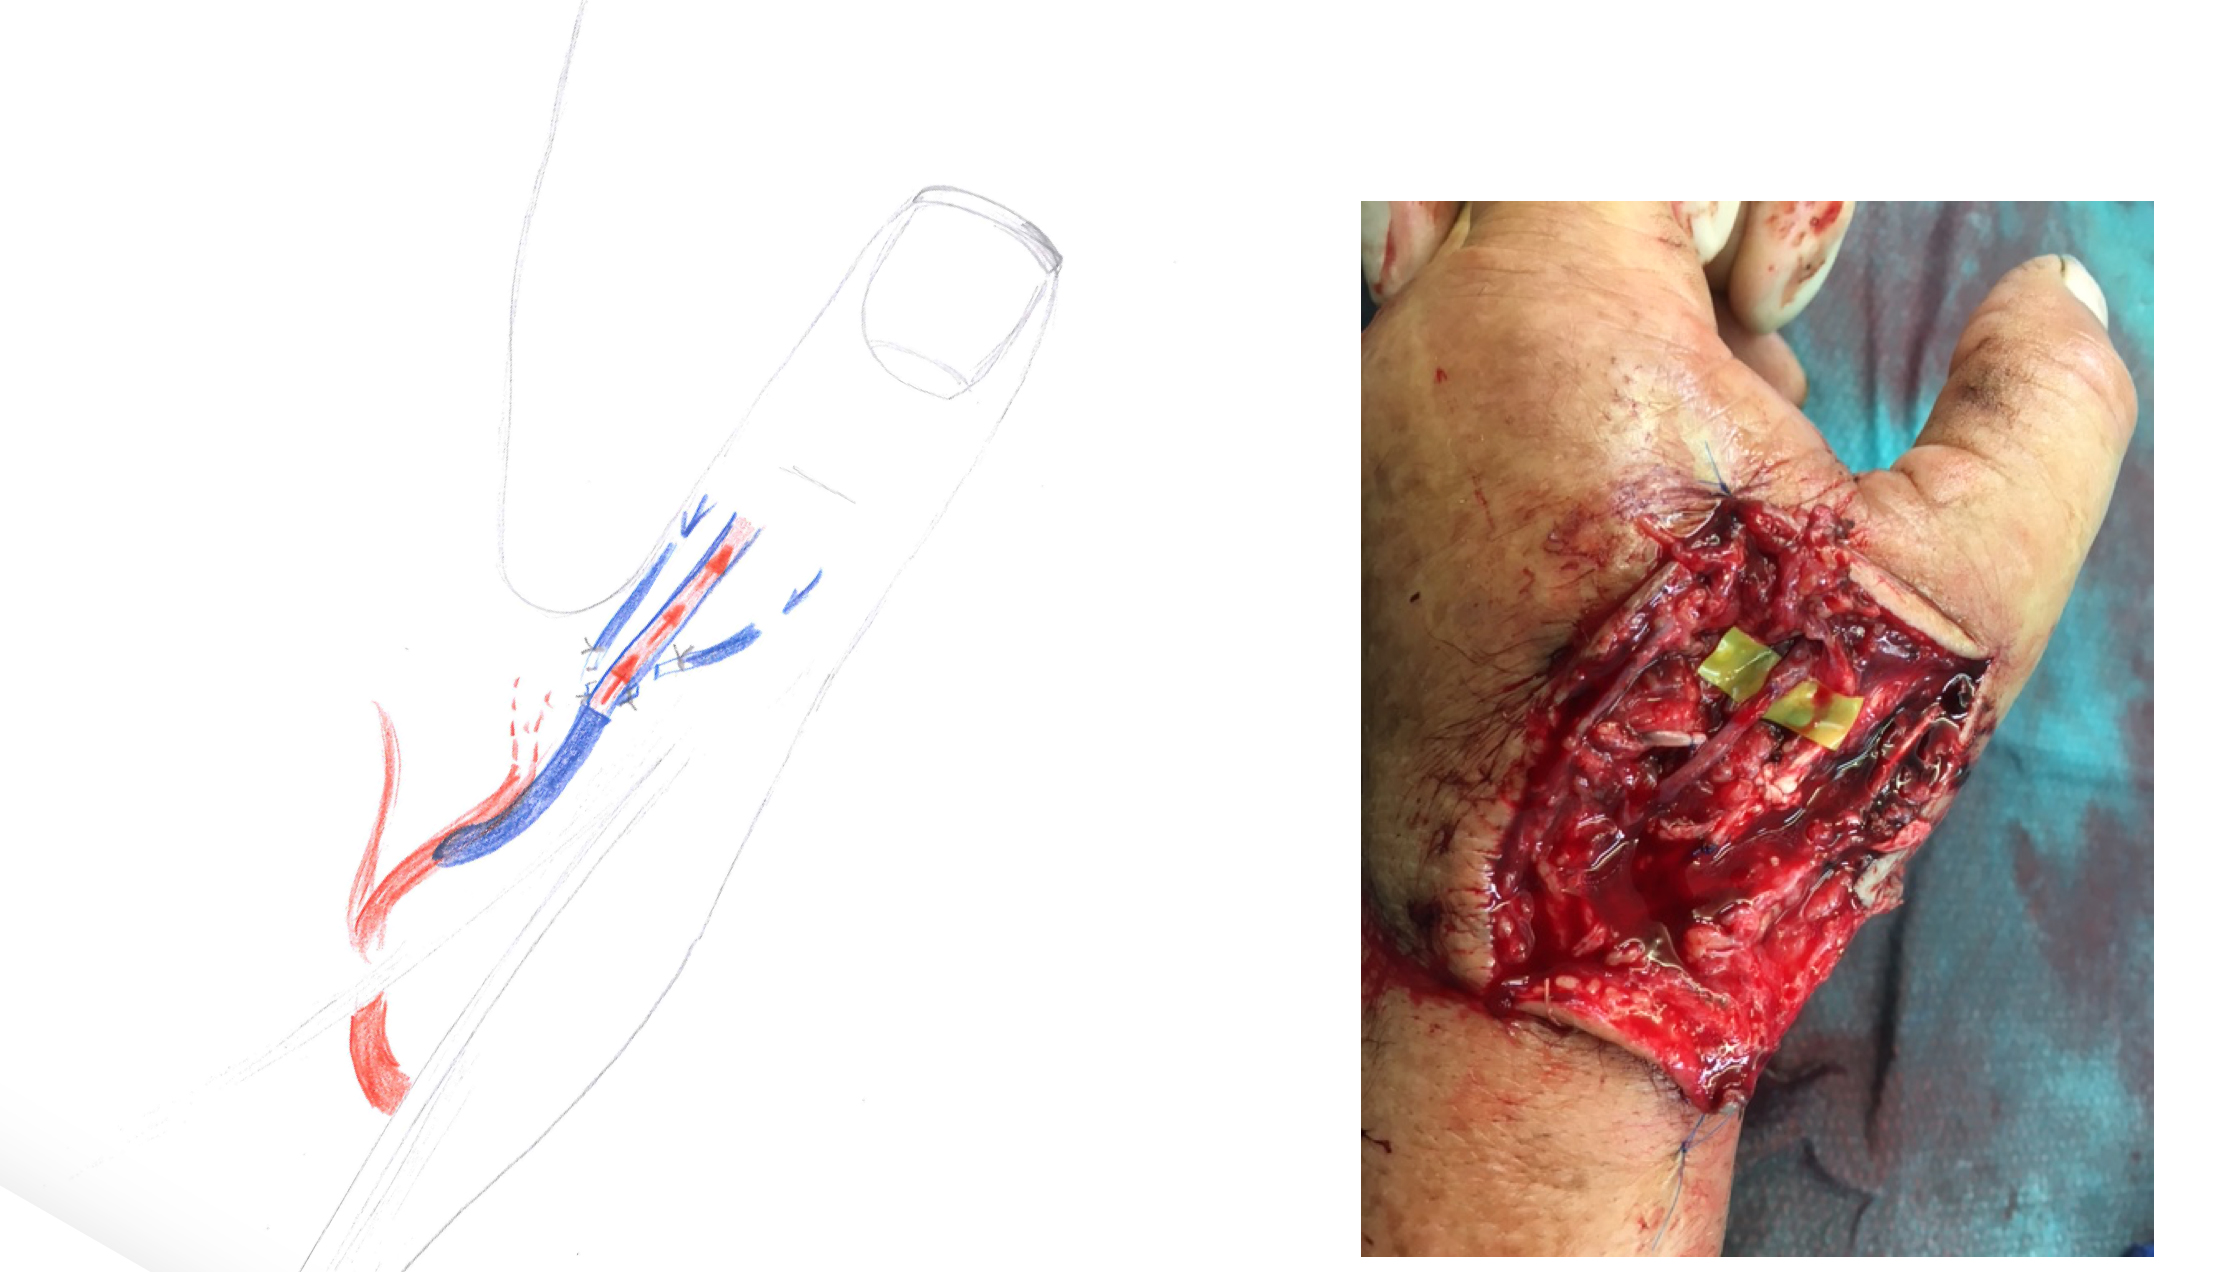
The more complex the injury, not only direct repair of arteries (inflow) orthotopically or to neighbouring arteries respectively interpositional veingrafts may be used. For the backflow (outflow) veingrafts are very commonly used, but they may also be interpositioned between arterial stumps (Figure 1).
On the arterial (inflow) and the venous side (outflow) there are different options of restoring blood flow in case of missing a proximal or distal vessel stump or dealing with additional soft tissue defects around the anastomoses (Table 1).
| Finding | Surgical options | Techniques | Remarks |
|---|---|---|---|
| Arterial inflow | |||
| Proximal and distal artery present | Primary arterial-arterial repair 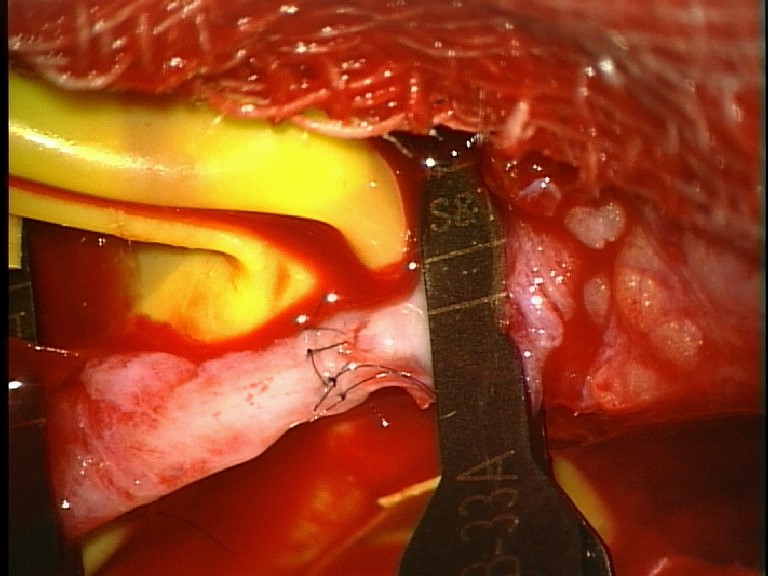 |
Interpositional arterial or vein graft: crushed arterial ends 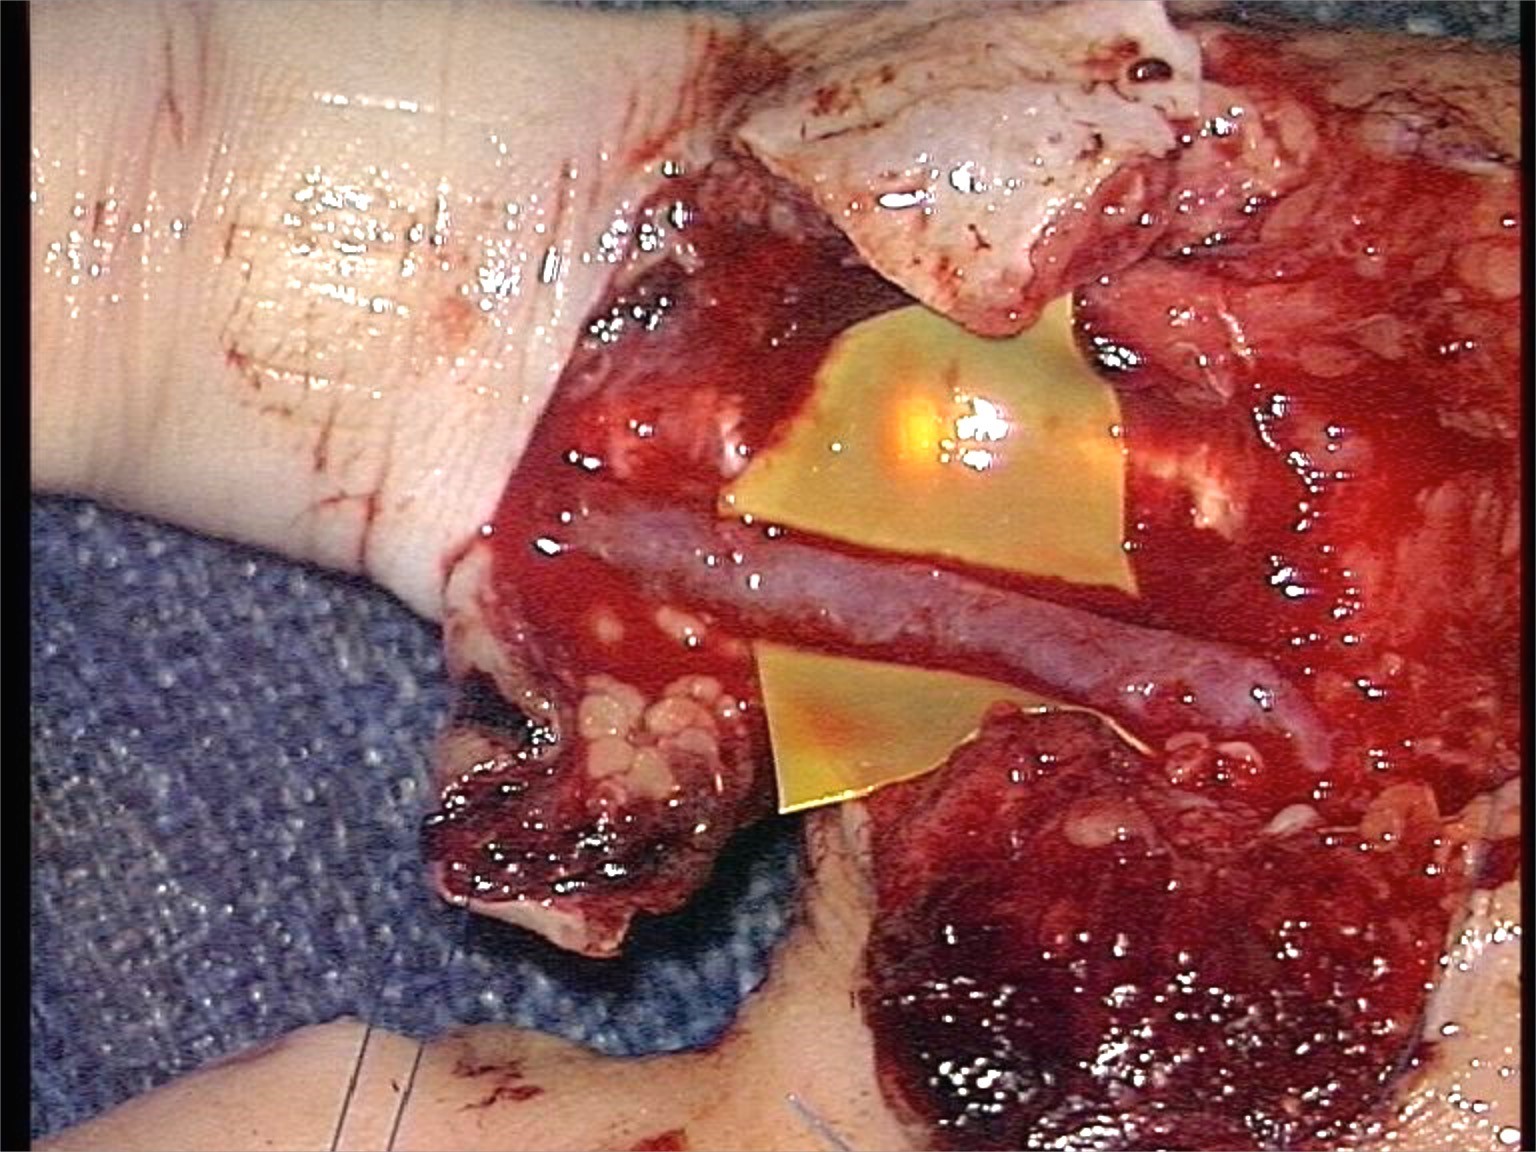 |
 |
| No distal artery | Venous arterialisation | Proximal artery + veingraft → dorsal veins of amputated part | 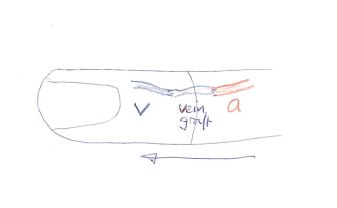 |
| Distal artery present but soft tissue defect | Arterialised venous flap | Proximal artery → venous flap → distal artery | 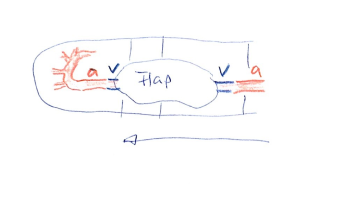 |
| Venous outflow | |||
| No distal vein | Artery only replantation | Only distal fingertip Tamai Zone I | Restoration of arterial inflow but no formal venous outflow |
| Proximal and distal vein | Primary venous-venous repaire | Interpositional vein grafts |
|
| Possible proximal vein but soft tissue defect | Distal vein +- vein graft → proximal vein in pedicled flap | Fasciocutaneous local flap with veins → venous outflow via flap | 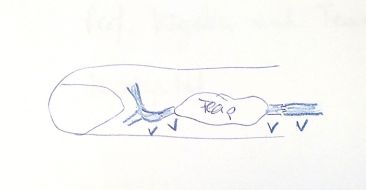 |
Types of microsurgical anastomoses
End-to-end arterial microanastomosis
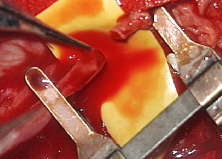
The afferent and efferent vessels are temporarily occluded with a double clamp after flushing the proximal and distal vesselstump (Figure 2a).
The size and strength is chosen according to the size of the artery or vein to be connected. The microscissors are used to cut the extremity of each artery perpendicular to its long axis. The vessel dilator is then inserted into each end of the divided vessel and gently opened to expand the arterial orifice. Residual blood from the lumen is flushed using heparinized saline and a 30-gauge blunt needle. At higher power, the adventitia is further trimmed near the edge of the arterial opening to prevent incorporation of the suture line. The double clamp is then gently adjusted until the cut ends of both the afferent and efferent vessels are approximated. This will allow to perform the anastomosis without tension. Proximal inflow of the artery is tested by opening the clamp (Figure 2b).
The anastomosis starts with the two angle sutures. They are positioned in an angle of 140–160° to each other in relation to the circumference of the vessel. This allows the anterior wall to fall away and show the posterior wall (Figure 3).
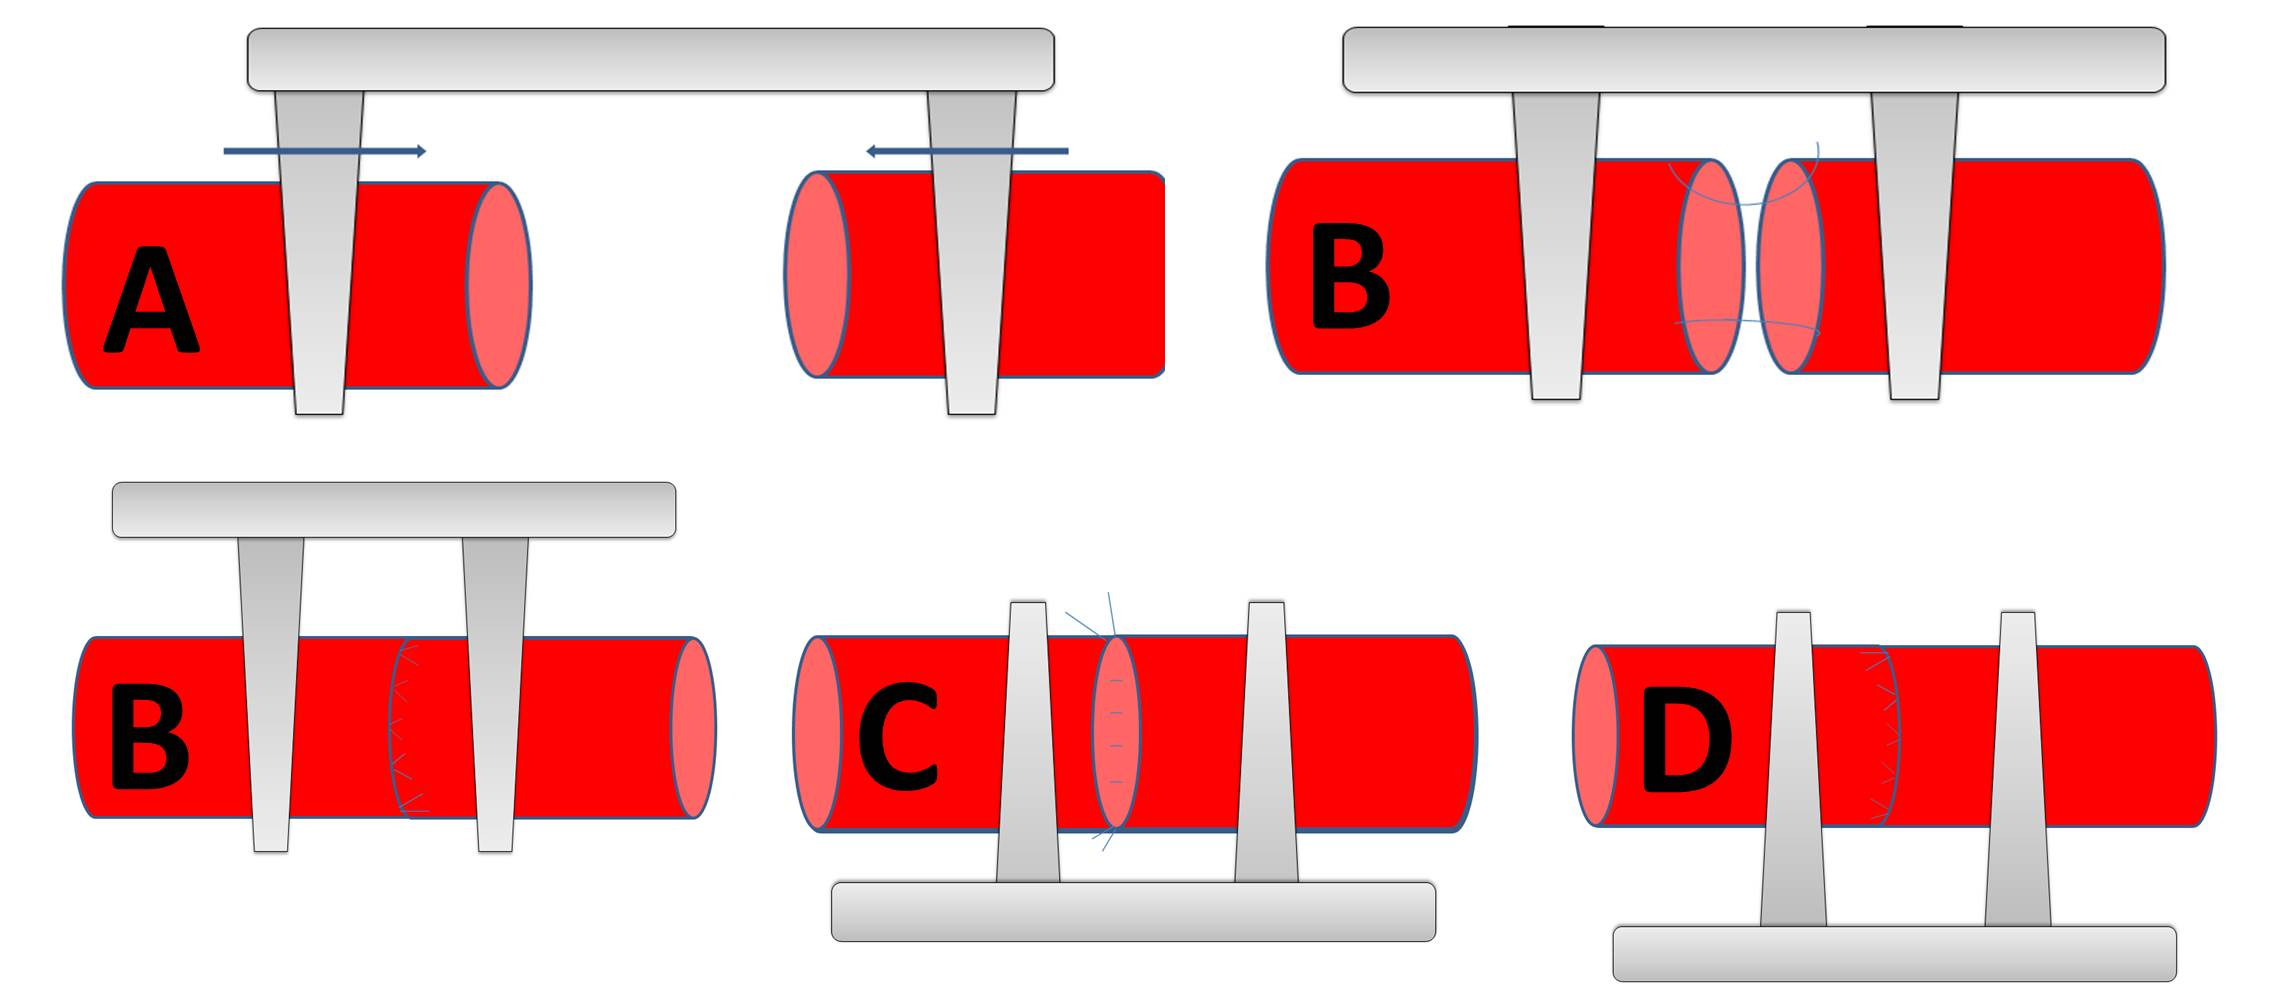
The microsurgeon must zoom in with the microscope to pass the needle through the arterial edge from the outside to the inside. The forceps is then gently placed within the other vessel in order to provide counterpressure as the needle punctures the tissue from the inside to the outside. In case of atheromatosis, double-armed 9–0 monofilament suture allows for passage of the needle from the luminal surface of both the afferent and efferent vessels. This maneuver prevents creation of a vessel dissection or intimal flap at the needle puncture site. Once the two angled sutures are in place, the suture of the anterior wall is completed following the biangulation technique. The double clip is then rotated in order to expose the posterior wall. Heparinized saline and a 30-gauge blunt needle are used to flush the lumen and the microsutures of the back wall are completed in the same manner. Before removing the temporary clamps and restoring flow, the anastomosis is inspected at higher power for any obvious gaps. The distal temporary clip is then removed before the proximal one. After a few moments, the anastomosis should be inspected for patency using the O’Brian patency test [2]. Hereby, the blood flow is occluded distal to the anastomosis by gently applying jeweller’s forceps or dilator and squeezing the vessel wall. A second pair of forceps or dilator applied at this point empties the blood in the vessel in a distal direction. The vessel is then occluded distally by applying pressure to the microforceps and the proximal occlusive forceps or dilator is released. If the anastomosis is patent, the previously emptied segment of vessel will fill swiftly from a proximal direction.
The same principle is used in venous anastomoses. However, the vessel walls are thinner and the mismatch of both luminae has to be controlled. Usually, a mismatch of 1:1.5 of arterial or venous vessel diameters can be compensated by gently stretching the smaller vessel diameter and spreading the sutures.
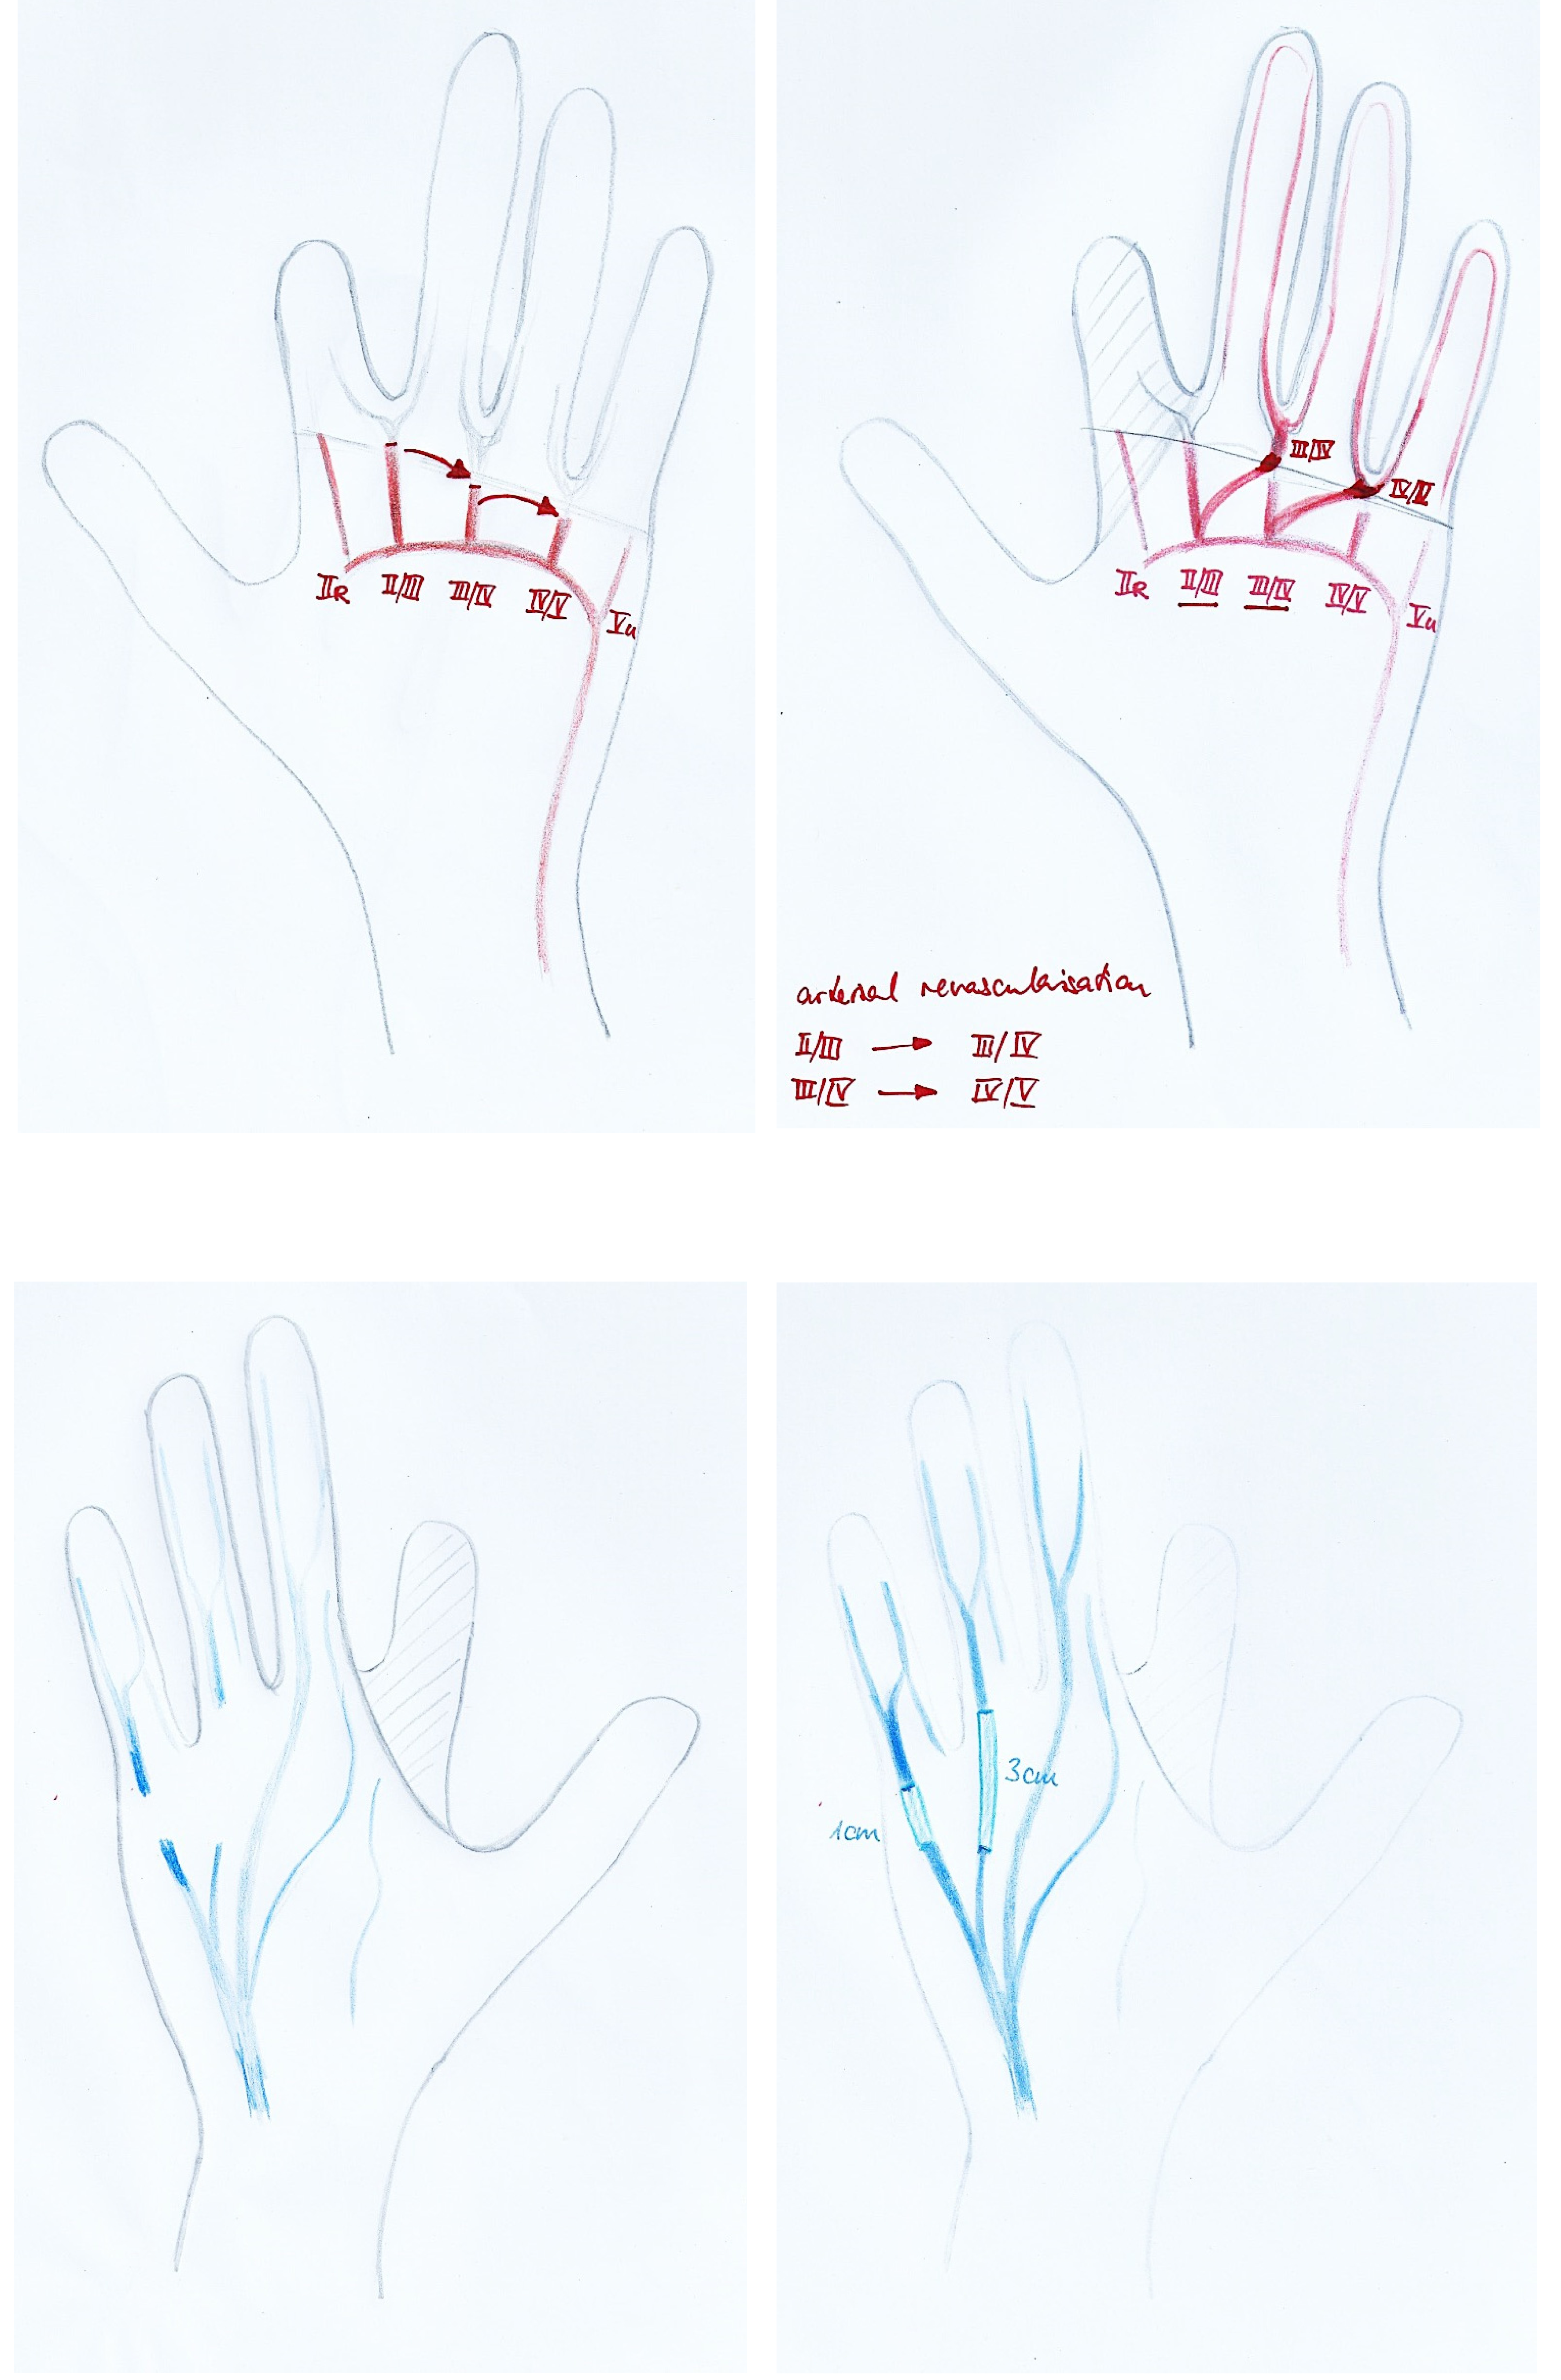
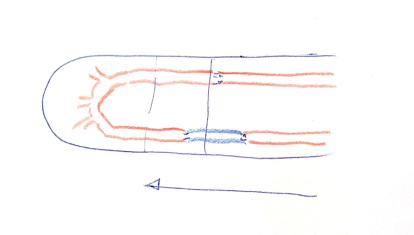
In degloving injuries of the hand, it is often difficult to identify adequate arteries in the avulsed tissue for revascularization. In such situations arteriovenous shunting with or without direct arterial repair is a solution to salvage digits. Arterialization of the venous system has been described as a salvage technique in replantation surgery, in arterialized venous flaps and in the management of hand ischemia. It is believed, a-v shunting induces a rapidly expanding capillary network providing nutrition to the ischemic tissue [3], [4]. Venous arterialization may salvage otherwise unreplantable or avulsed thumbs or thumbs with critical ischemia (Figures 4 and 5).
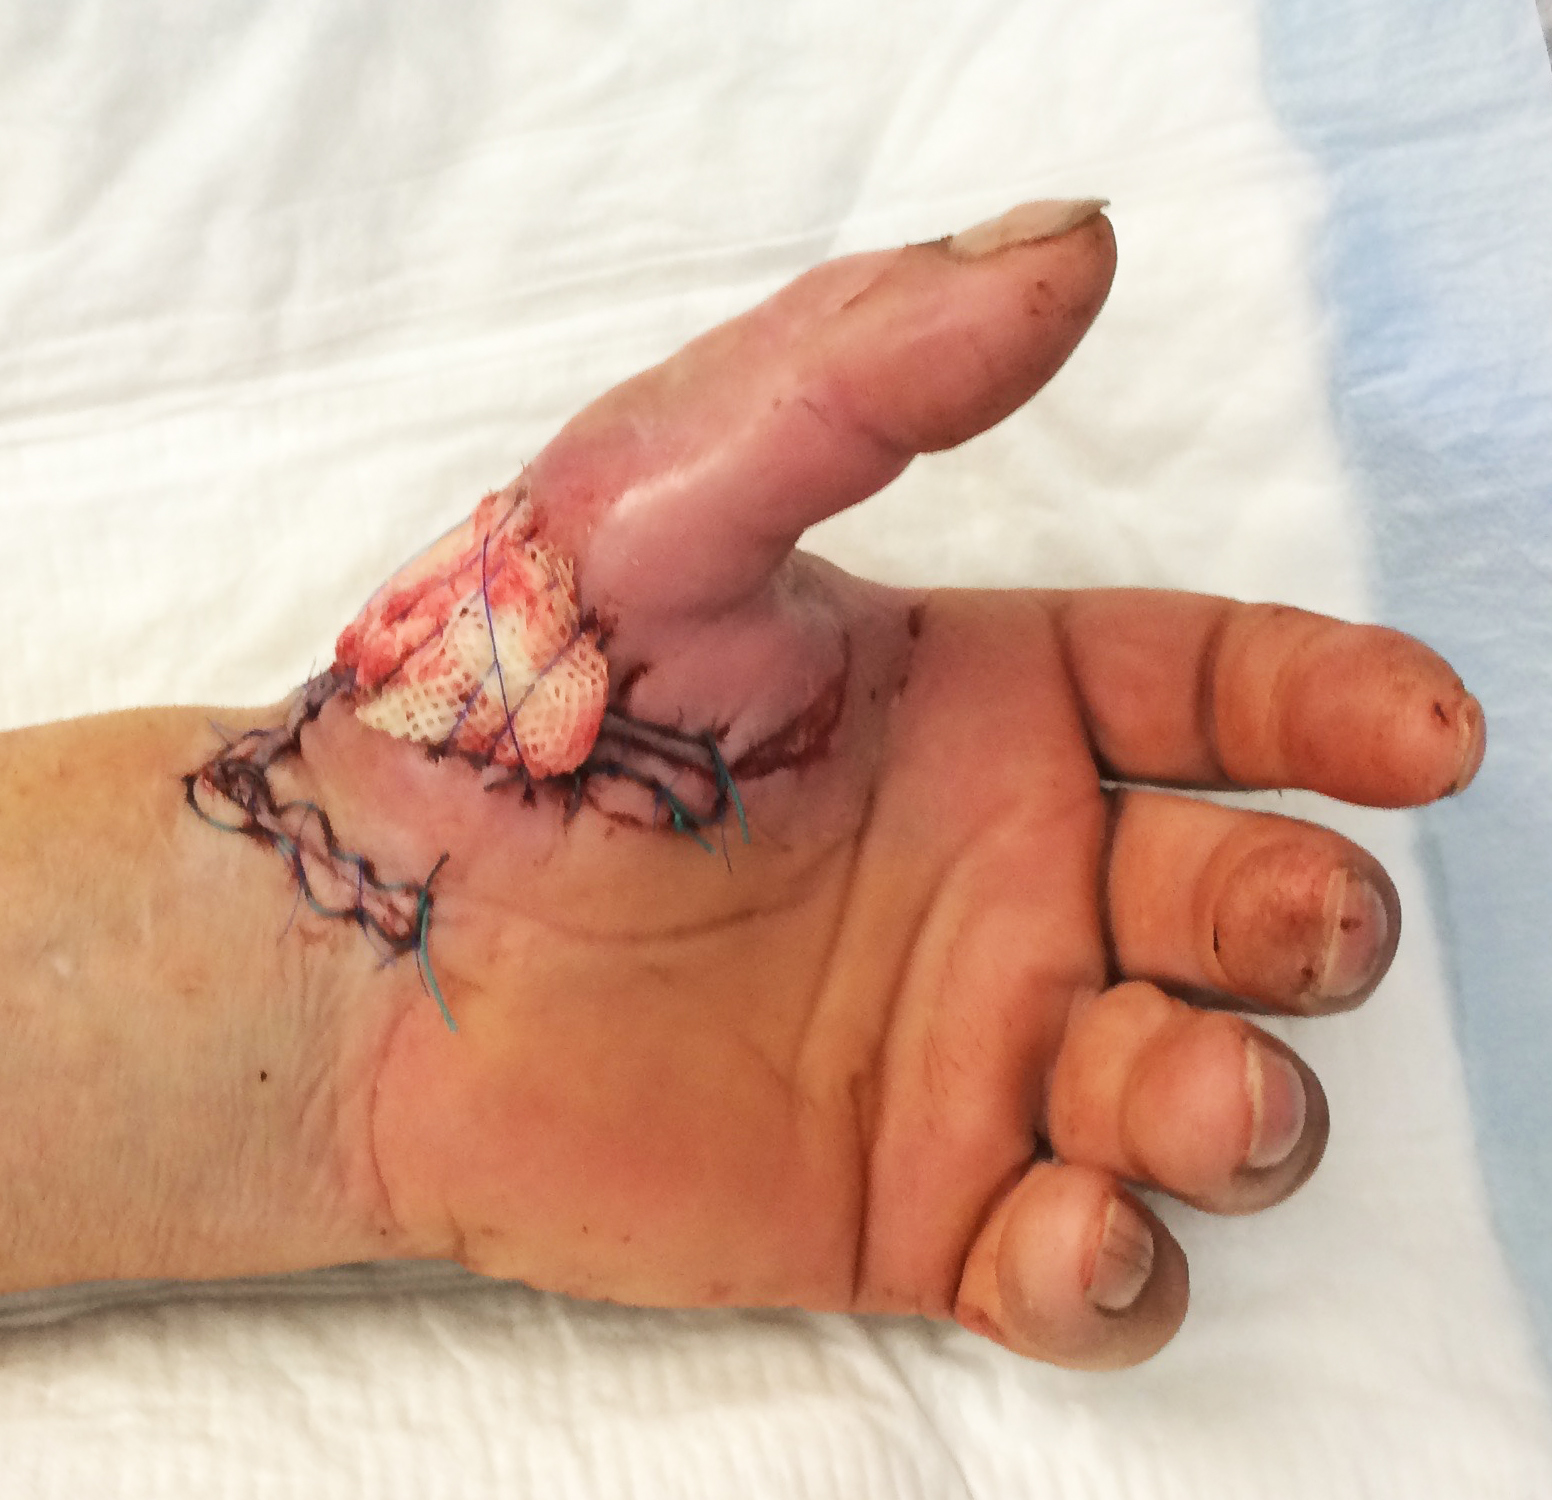
However, restoration of circulation may need up to one week with swelling, blistering and or different colour (grey instead of pinkish) and temperature (rather cool, below 30° compared to reference digit) monitoring compared to classical arterial-arterial anastomosis.
End-to-side microanastomosis
The end-to-side microanastomosis is technically more difficult to carry out than an end-to-end anastomosis. However, it avoids ligature of the recipient vessel and allow two vessels of different diameters to be anastomosed. A review of different surgical techniques of end-to-side microanastomosis has been recently performed by Rifai et al. [5]. This includes single-cut or slit arteriotomy (longitudinal and transverse) and excision arteriotomy [5]. The latter technique can be performed from either inside-out (excision with micropunch) [6], [7] or outside-in [8], [9], [10], [11], [12]. Excision arteriotomy performed from outside-in are made with either microscissors [8], [9], Acland-Banis clamp [10], triangular cutting scissors [11], or Excimer laser [12]. In this chapter, we demonstrate the slit arteriotomy technique and excision-arteriotomy using micropunch.
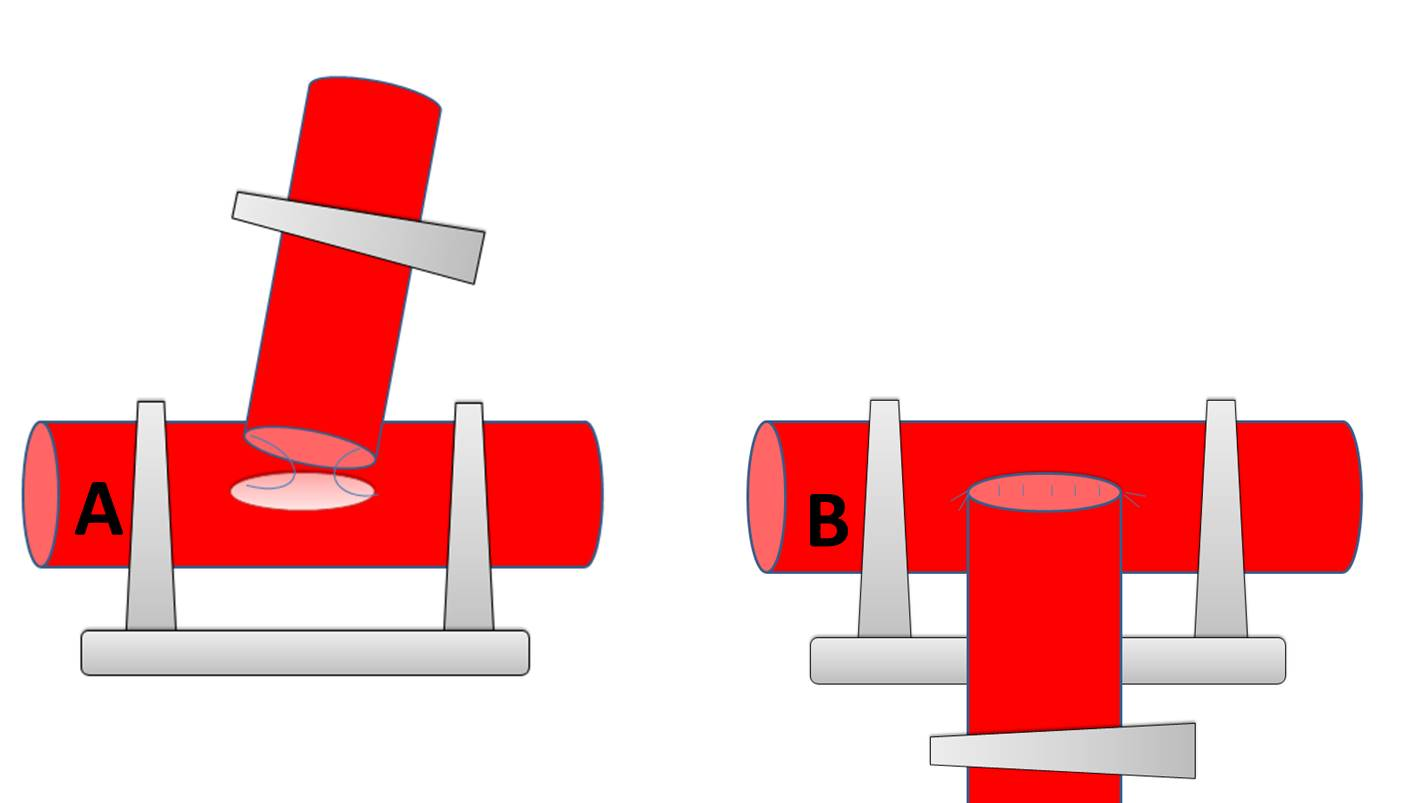
The recipient vessel is temporarily occluded above and below to the prospective anastomosis site. A linear arteriotomy is performed in the recipient vessel by a microknife using the longitudinal or transverse slit technique [5]. This technique is preferred in very small diameter vessels. The lumen is then flushed with heparinized saline. The main disadvantage is the potential to damage the posterior wall or cut through the vessels but on the other hand no defect is created in the vessel wall. Using curved or straight microscissors for an excision arteriotomy, a first cut on one side at 30° from perpendicular and a second symmetric cut on the other side by shifting scissors to the other hand is performed. The disadvantage is the difficulty to control the size of the arteriotomy. After a satisfactory sharply formed vessel hole the anastomosis begins with the two angled sutures. Once again, double-armed 9–0 monofilament suture allows for passage of the needle from the luminal surface of both the donor and recipient vessels. This maneuver prevents creation of an intimal flap at the needle puncture site. Once the two angled sutures are in place, the suture of the anterior wall is completed following the biangulation technique. The posterior wall is then exposed and sutured in the same fashion. Before removing the temporary clips and restoring flow, the anastomosis is inspected for any obvious gaps. The distal temporary clip is then removed before the proximal one.
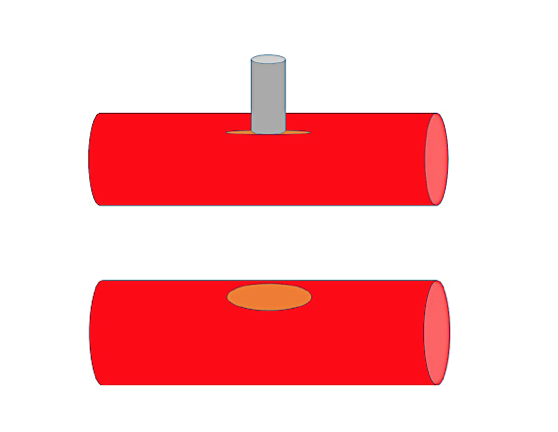
The punch biopsy method uses a 1.0 to 1.5 mm micropunch (Ted. Pella Inc., Redding, CA, USA), or even a 1.7 to 2.7 mm vascular punch [5], [6], [7]. The recipient vessel is temporarily occluded above and below to the prospective anastomosis site. A longitudinal slit is performed and the anvil is inserted through the slit into the vessel’s lumen and the handle is then pressed down. The punch make a clear-cut round or elliptical hole. Afterwards the anastomosis can be performed as described in the previous section. The drawbacks are the risk of complete laceration of the intima of the opposing wall and of the incision being larger than the punch’s anvil.
Sutureless technique
Historical review of the microsurgical sutureless techniques has been performed in 2009 [1]. The non-suture techniques can be divided into four groups based on the mechanism of sutures used: double intubation including tubes and stents, intubation-eversion including simple rings/cuffs, double eversion including staples and double rings, and wall adjustment with adhesives or laser. All these techniques include a faster and easier microvascular anastomosis. Nevertheless, disadvantages of the sutureless techniques include toxicity, high cost, leakage and aneurysm formation. In this chapter, we make the choice to present three sutureless techniques which are used in the clinical practice for venous anastomoses: cuff technique, coupler device and laser assisted microanastomoses.
Cuff microanastomoses
Since the first work of Payr [13], [14] and Haller [15], the cuff microanastomosis technique has been refined. In the actual surgical technique, the recipient vessel is temporarily occluded above and below to the prospective anastomosis site. This microsurgical technique is usually used for the venous microanastomoses because the elasticity of the vein allows its eversion. The afferent vessel is introduced into the body of the cuff, without any rotation. Its vascular wall is then inverted over the external surface of the cuff using two forceps (Figure 8).

A 10–0 nylon circumferential ligature prevent the sliding of the vein over the body of the cuff. Heparinized saline and a 30-gauge blunt needle are used to flush the lumen. The afferent vessel is then introduced gently into the lumen of the efferent vessel. Another circumferential ligature is then placed over the body of the cuff, proximal to the first ligature, in order to secure the anastomosis and avoid blood and intimal exposition. Before removing the temporary clips and restoring flow, the anastomosis is inspected for any obvious rotation of the vessel into the cuff.
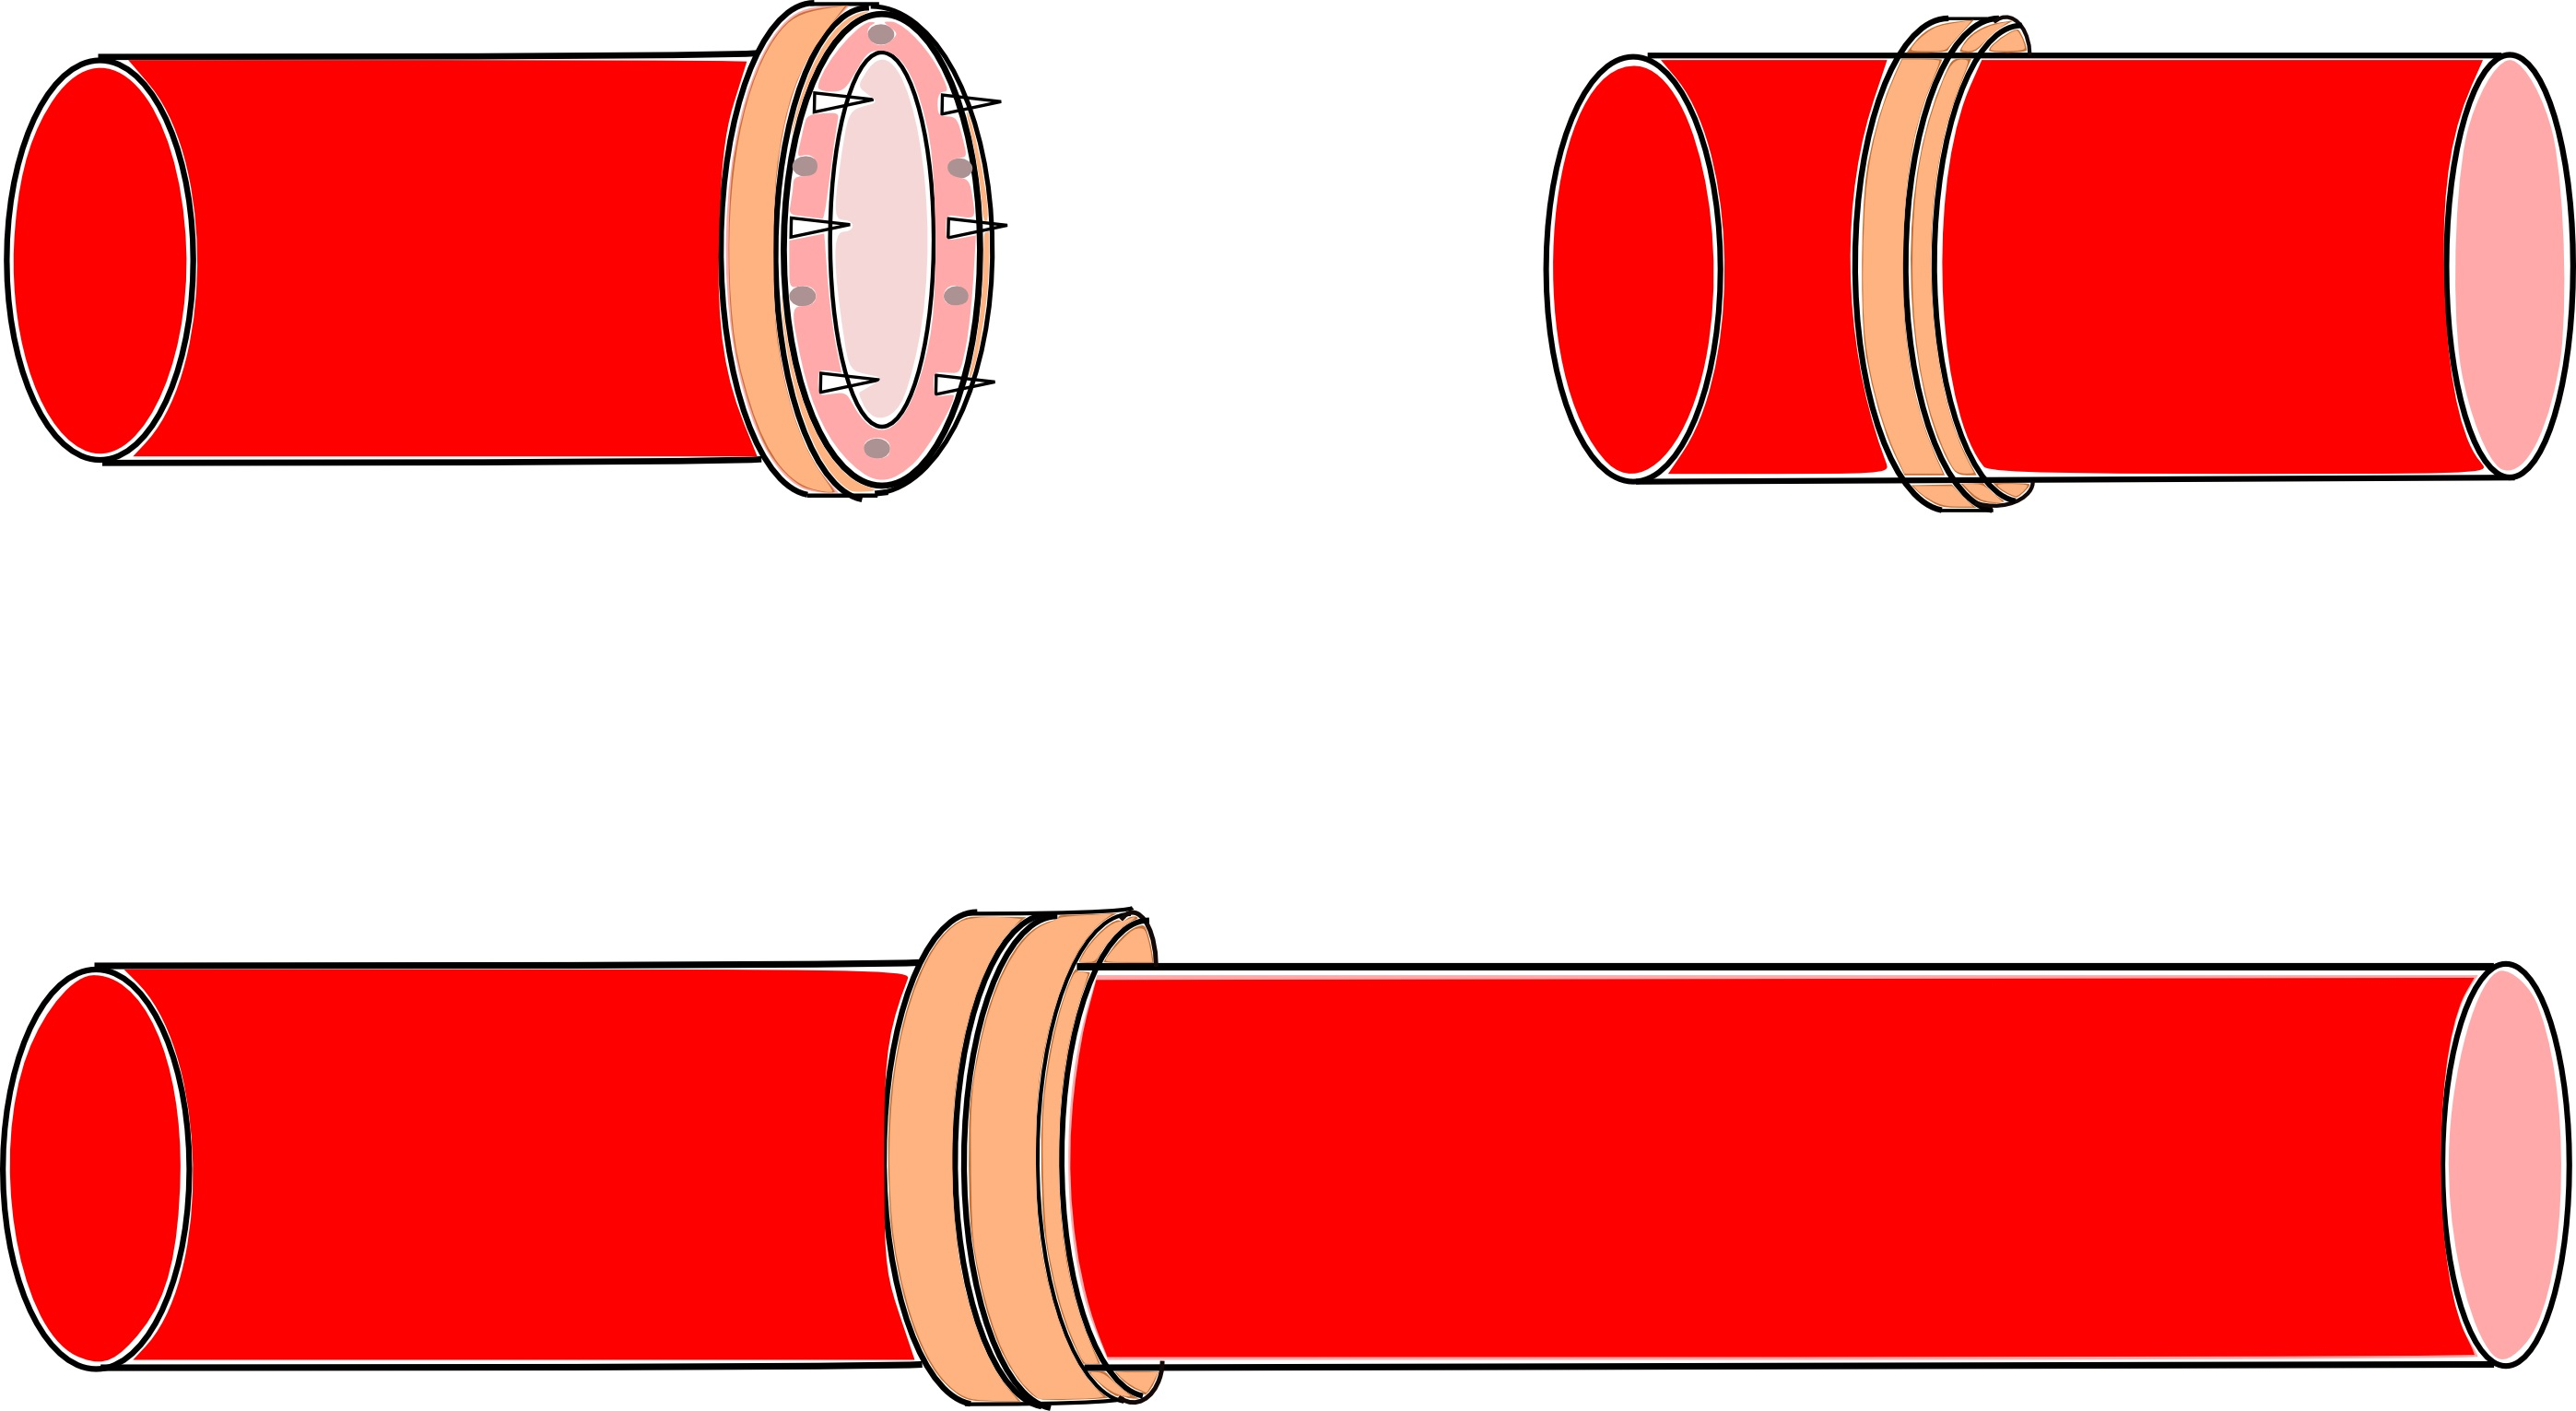
The coupler device
The 3M and ACE coupling devices are adaptations of the first works of Nakayama [16]. They are currently on the market under the name of microvascular anastomotic system. The system consists of a high-density polyethylene ring and stainless steel pins that are implanted with reusable anastomotic instruments.
This microsurgical technique is usually used for the venous microanastomoses because the elasticity of the vein allows its eversion. The afferent vessel is introduced into the body of the ring, without any rotation. Its vascular wall is then inverted over the external surface of the ring using two forceps. The small scales prevent the sliding of the vein over the body of the ring (Figure 9). The same technique is then performed for the efferent vessel. Afterwards both rings are connected.
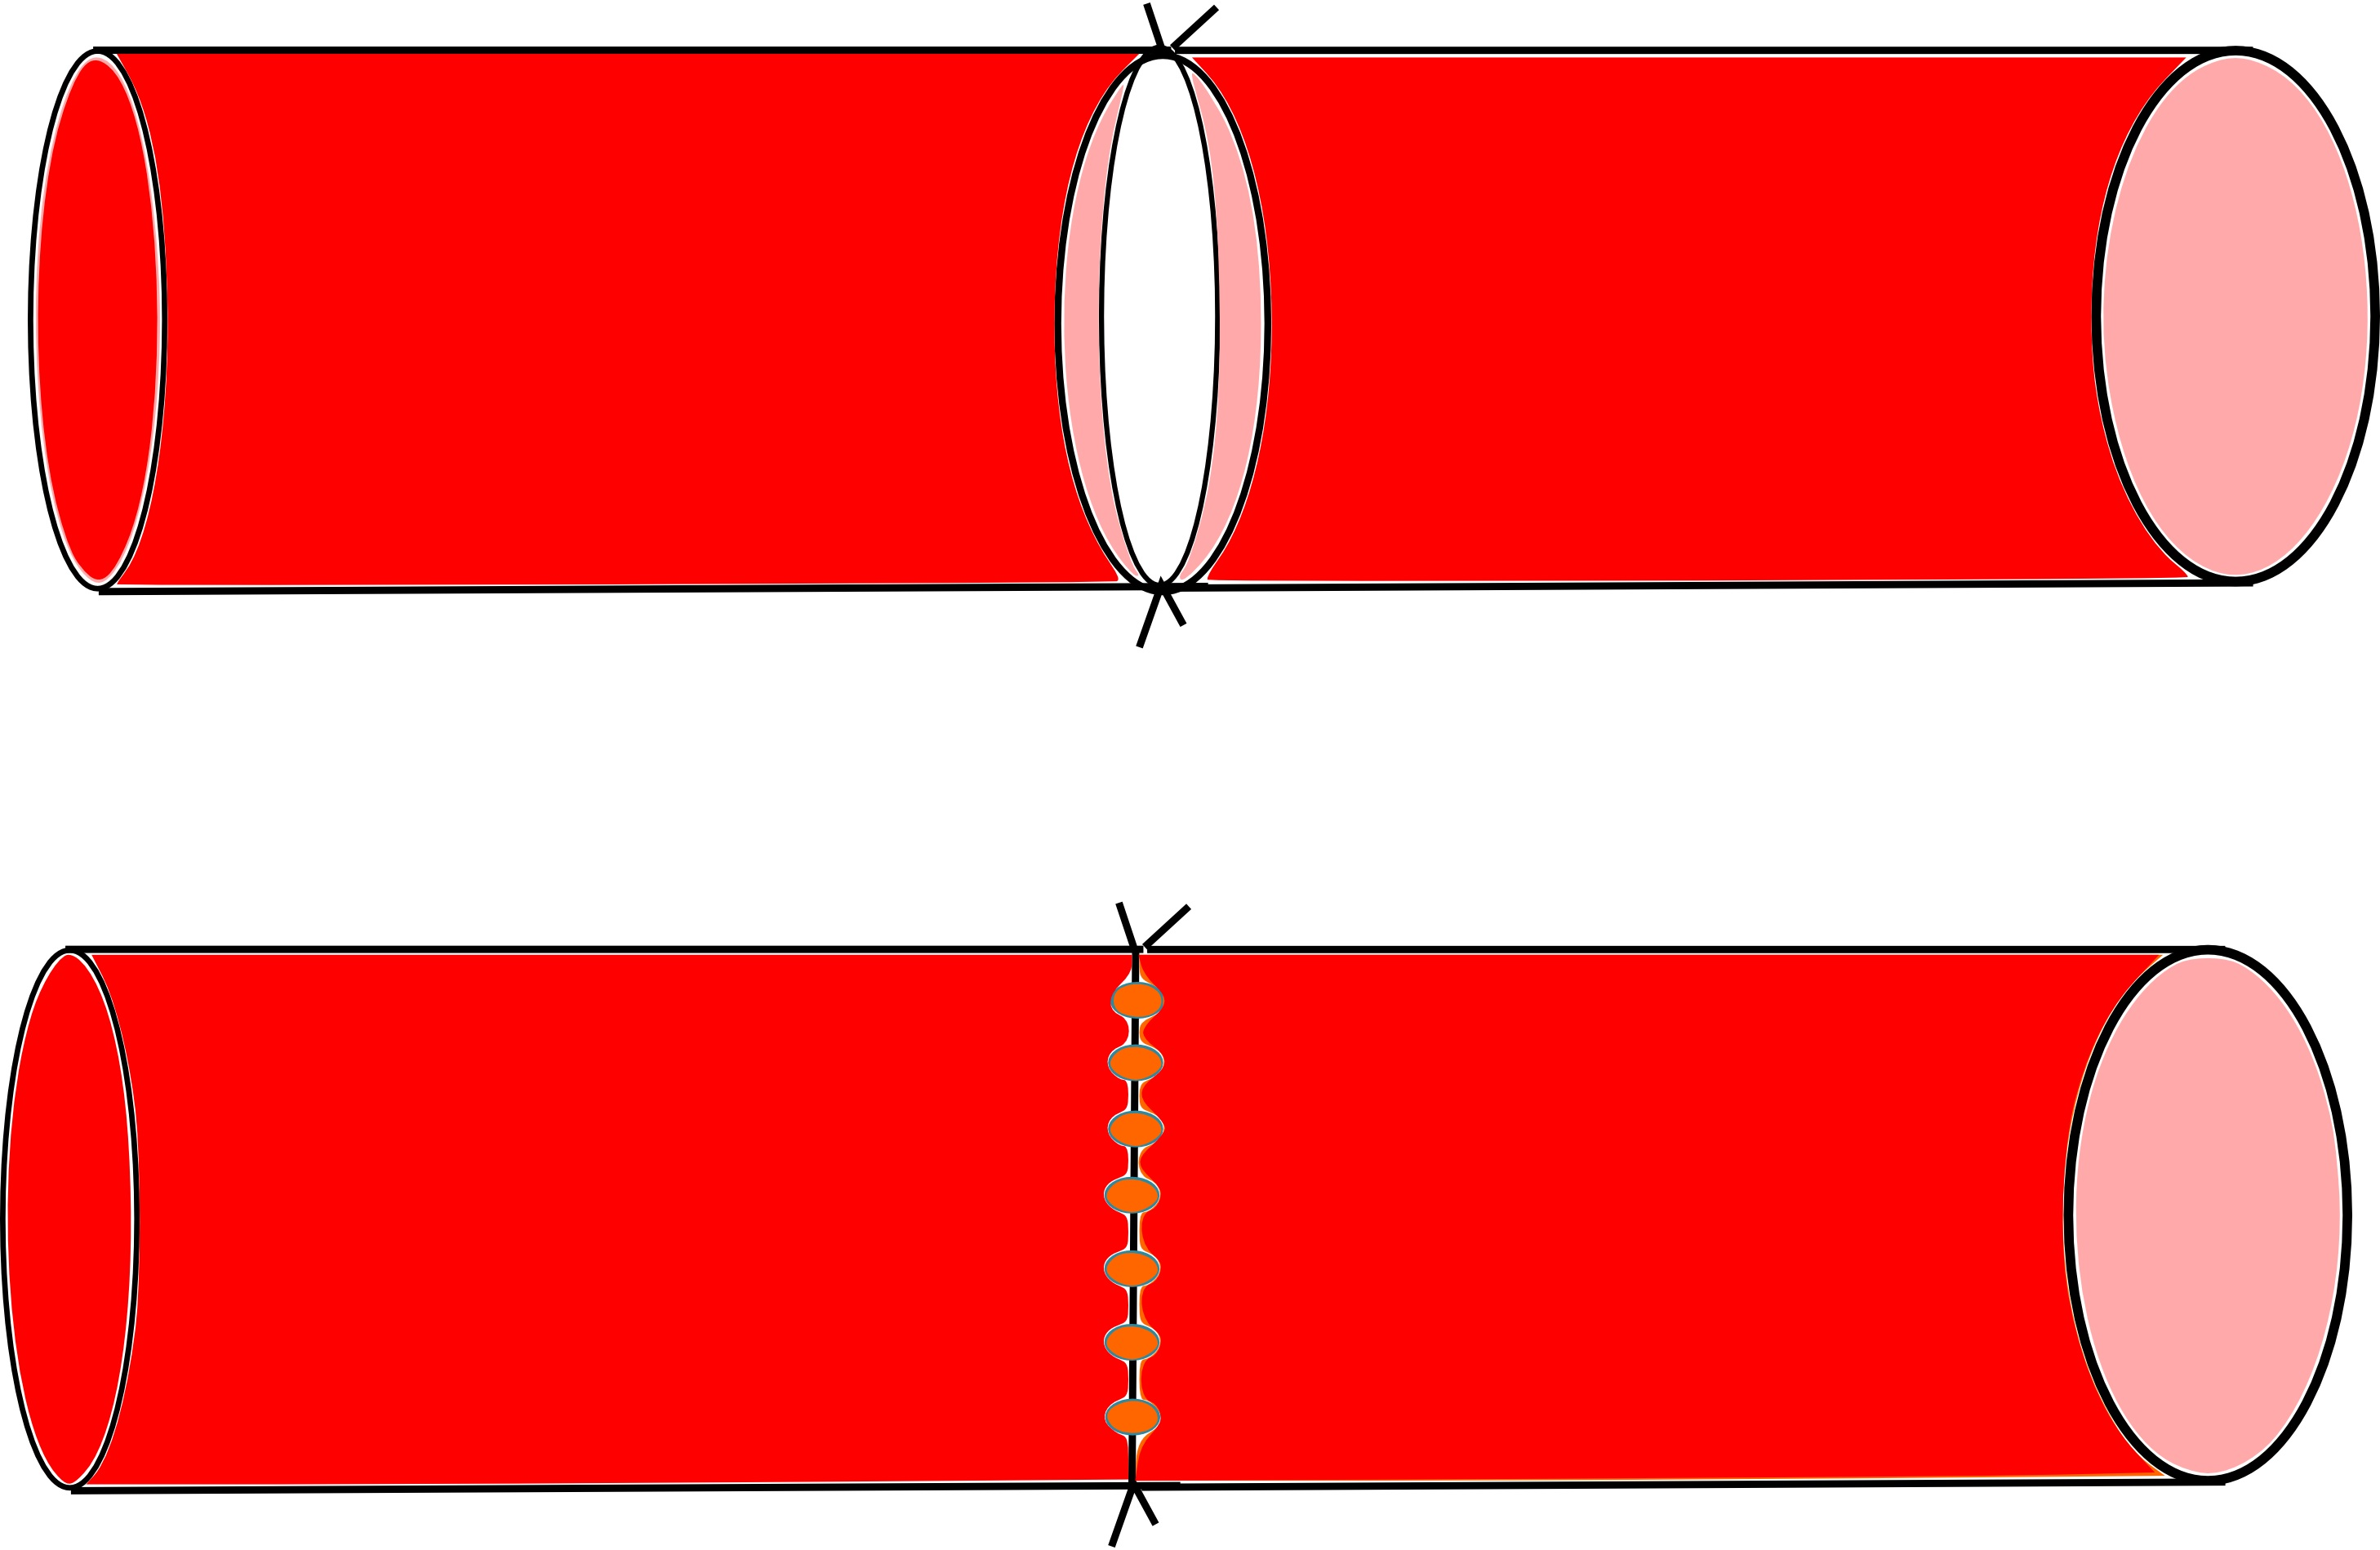
Laser assisted microanastomoses
Since 1979 [17], the use of laser-assisted microvascular anastomosis has been steadily on the rise, with a wide range of laser wavelengths used, including carbon dioxide lasers, yttrium aluminum garnet laser, argon laser, and diode lasers [18]. Numerous previous studies have emphasized on the benefits of the laser technique: the procedure is faster than conventional anastomoses, and surgically induced vessel damage is limited, with less inflammatory reaction. The anastomosis begin with the two angled sutures that are approximated to remove all longitudinal tension. A laser tissue weld is then performed on both the anterior and posterior wall to complete the anastomoses (Figure 10).
Based on the literature, the 1950 nm diode laser seems to be an ideal wavelength for microvascular anastomoses [19], [20]:
- the wavelength’s penetration (150 nm) matches the thickness of the vascular wall’s adventitia and media. This allows for welding of the vessels without the use of a chromophore or solder preparation. The resulting weld strength of 4 x 10⁶ dynes/cm² is comparable to the strength of suture repairs (4 x 10⁶ dynes/cm²);
- aneurysm rates appear minimal for this wavelength when compared either with CO2 or Argon Laser [21];
- evaluation of the LAMA with flow-MRI underlined better blood flow when compared with traditional procedures [22]; and finally,
- since the diode laser is operated at a relatively low power, the system is very compact and reliable for utilization in the microsurgical operating room.
References
[1] Leclère FM, Schoofs M, Mordon S. [Historical review and future orientations of the conventional vascular microanastomoses]. Ann Chir Plast Esthet. 2011 Jun;56(3):232-40. DOI: 10.1016/j.anplas.2009.12.009[2] Legagneux J, Gilbert A. Apprentissage de la microchirurgie vasculaire. EMC–Techniques chirurgicales–Chirurgie plastique reconstructrice et esthétique. 2007;1-15.
[3] Rodríguez-Lorenzo A, Lin CH, Lin CH, Ching WC, Lin YT. Replantation of a degloved hand with added arteriovenous anastomoses: report of two cases. J Hand Surg Am. 2009 Dec;34(10):1864-7. DOI: 10.1016/j.jhsa.2009.07.021
[4] Tian L, Tian F, Tian F, Li X, Ji X, Wei J. Replantation of completely amputated thumbs with venous arterialization. J Hand Surg Am. 2007 Sep;32(7):1048-52. DOI: 10.1016/j.jhsa.2007.05.011
[5] El Rifaï S, Boudard J, Haïun M, Obert L, Pauchot J. Tips and tricks for end-to-side anastomosis arteriotomies. Hand Surg Rehabil. 2016 Apr;35(2):85-94. DOI: 10.1016/j.hansur.2016.02.002
[6] Lynch JB, Hussey AJ, O'Sullivan ST. Using a punch biopsy to fashion an arteriotomy for end-to-side anastomosis. J Reconstr Microsurg. 2011 Feb;27(2):139-40. DOI: 10.1055/s-0030-1267386
[7] Hallock GG, Rice DC. Use of a micropunch for arteriotomy in end-to-side anastomosis. J Reconstr Microsurg. 1996 Jan;12(1):59-62; discussion 62-3. DOI: 10.1055/s-2007-1006454
[8] Acland RD. Microsurgery practice manual. St. Louis: Mosby; 1980.
[9] Godina M. Preferential use of end-to-side arterial anastomoses in free flap transfers. Plast Reconstr Surg. 1979 Nov;64(5):673-82.
[10] Zoubos AB, Seaber AV, Urbaniak JR. Hemodynamic and histological differences in end-to-side anastomoses. Microsurgery. 1992;13(4):200-3. DOI: 10.1002/micr.1920130411
[11] Hedén P. A triangular cutting arteriotomy scissors facilitating end-to-side anastomoses. Plast Reconstr Surg. 1992 Feb;89(2):353-5. DOI: 10.1097/00006534-199202000-00028
[12] Tulleken CA, Verdaasdonk RM, Berendsen W, Mali WP. Use of the excimer laser in high-flow bypass surgery of the brain. J Neurosurg. 1993 Mar;78(3):477-80. DOI: 10.3171/jns.1993.78.3.0477
[13] Payr E. Beiträge zur Technik der Blutgefäss- und Nervennaht nebst Mitteilungen über die Verwendung eines resorbierbaren Metalles in der Chirurgie. Arch Klin Chir. 1900;62:67-93.
[14] Payr E. Zur Frage der zirkularen Vereinigung von Blutgefässe mit resorbierbaren Prothesen. Arch Klein Chir. 1904;72:32-54.
[15] Haller JD, Kripke DC, Rosenak SS, Dee R, Roberts T, Rohman M, Goetz RH. Long-term results of small vessel anastomoses with a ring technic. Ann Surg. 1965 Jan;161:67-72.
[16] Nakayama K, Tamiya T, Yamamoto K, Akimoto S. A simple new apparatus for small vessel anastomosis. Surg 1962;52(6):918-31.
[17] Jain KK. Sutureless extra-intracranial anastomosis by laser. Lancet. 1984 Oct 6;2(8406):816-7. DOI: 10.1016/S0140-6736(84)90745-1
[18] Wolf-de Jonge IC, Beek JF, Balm R. 25 years of laser assisted vascular anastomosis (LAVA): what have we learned? Eur J Vasc Endovasc Surg. 2004 May;27(5):466-76. DOI: 10.1016/j.ejvs.2004.02.021
[19] Leclère FM, Schoofs M, Buys B, Mordon SR. Outcomes after 1.9-microm diode laser-assisted anastomosis in reconstructive microsurgery: results in 27 patients. Plast Reconstr Surg. 2010 Apr;125(4):1167-75.
[20] Leclère FM, Schoofs M, Buys B, Mordon SR. 1.9 µm diode laser assisted vascular microanastomoses: Experience in 40 clinical procedures. Lasers Surg Med. 2011 Apr;43(4):293-7. DOI: 10.1002/lsm.21055
[21] White RA, White GH, Fujitani RM, Vlasak JW, Donayre CE, Kopchok GE, Peng SK. Initial human evaluation of argon laser-assisted vascular anastomoses. J Vasc Surg. 1989 Apr;9(4):542-7.
[22] Leclère FM, Schoofs M, Auger F, Buys B, Mordon SR. Blood flow assessment with magnetic resonance imaging after 1.9 microm diode laser-assisted microvascular anastomosis. Lasers Surg Med. 2010 Apr;42(4):299-305. DOI: 10.1002/lsm.20914